DTI Task Card
This document describes how to use the task card for Diffusion
Tensor Imaging (DTI Task Card) on a SIEMENS NUMARIS 4
satellite console. This task card allows visualization of diffusion
tensor imaging data. A general knowledge of MRease usage is assumed.
Load Image Data
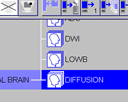
Open the Patient Browser.
Select the series of the original diffusion data to be used for
diffusion tensor map calculation and visualization. Then click on
the DTI icon in the upper left corner of the
Patient Browser to load the data into the
DTI Task Card.
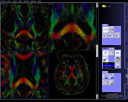
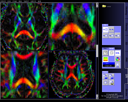
After data is loaded and calculated, the diffusion tensors can now
be visualized in different patterns. |
|
User Interface Description
Tool Buttons
| View |
 |
|
 |
1:1. Set the current
viewpage the same size of the view port. |
 |
4:1. Split view port to
allow 4 viewpages shown together. |
 |
9:1. Similar to above. |
 |
16:1. Similar to above. |
 |
Zoom In. Zoom in the current
selected image by a factor of 2. |
 |
Zoom Out. Zoom out the
current selected image by a factor of 2. |
 |
Zoom ... Zoom the current
selected image by an arbitrary factor chosen by user. |
 |
Restore. Restore the current
image's size and position. |
 |
Restore All. Restore all the
images' size and position. |
|
| Image |
 |
|
 |
Tensor Map. Set current
visualization to 3D rendering of diffusion tensors. |
 |
 |
Plain Image. Set current
visualization to generic color-coded or grayscale bitmap. |
 |
 |
HSL Color Space. Toggle
between HSL (Hue-Saturation-Luminence) or RGB
(Red-Green-Blue) color space for color value windowing. Default status is on
(recommended). |
 
 |
Lines, Boxoids or Ellipsoids. Set the
representing object to Line, Boxoid or Ellipsoid for the
visualization of diffusion tensor. The small dark arrow on the
right bottom of the button indicates that a drop-down menu will be
shown if clicked, allowing to select the object.
This button is only shown when Tensor Map
mode is chosen. |
  |
Color or Grayscale. Set the generic map to color or
grayscale.
This button is only shown when Plain Image
mode is chosen. |
 |
Color Sphere. Show the color
sphere indicating the direction-color coding for
visualization. |
 |
Noise Threshold. Manually
set the noise threshold for rendering (valid from 0 to 100). Noise threshold is
used to determine background in Low b image. |
 |
Autoset Noise Threshold.
Automatically set the noise threshold as the mean value plus 6 times standard deviation of low b background. |
|
| Map |
 |
|
 |
FA. Set Fractional
Anisotropy as the weighting factor for current
visualization/maps. |
 |
E1-E3. Set E1 minus E3 as
the weighting factor for current visualization/maps. E1, E2 and E3
represents the three eigen-values of the diffusion tensor at each
voxel. |
 |
E1. Set E1 as the weighting
factor for current maps. Only generic grayscale map is valid at
this mode. |
 |
E2. Set E2 as the weighting
factor for current maps. Only generic grayscale map is valid at
this mode. |
 |
E3. Set E3 as the weighting
factor for current maps. Only generic grayscale map is valid at
this mode. |
|
| Patient |
 |
|
 |
Load Pixel Data From File.
Load pixel data from an existing .bshort file. |
 |
Close Patient. Close the
current patient. |
 |
Write New Series. Write new
series into database. There will be a pop-up dialog allowing to
selection what maps (FA, E1-E3, etc.) to write. The new images can be loaded into
the Viewing Task Card.
This button is only valid when data is loaded from database (not
.bshort file). |
 |
Save As Bitmap. Save the
current viewpage image to a Windows bitmap file. |
|
|
Note:
-
All of the above commands except the ones in "Patient" category
can be found in the main menu on top of the task card.
-
Move the mouse cursor over each button to show its tooltip.
Tooltip can only be shown when the button is not grayed.
-
Loading a new series (new patient data) will close the current
loaded patient and clear all the previously rendered images.
|
Scrollbar
 |
Home. Move to the first page of images. (hotkey:
Home) |
 |
Previous Row. Move to the previous row of
images. |
 |
Next Row. Move to the next row of images. |
 |
End. Move to the last page of images. (hotkey:
End) |
|
|
Previous Page. Move to the previous page of images.
(hotkey: Page Up) |
|
Next Page. Move to the next page of images.
(hotkey: Page Down) |
|
Mouse
 |
At this cursor, hold left button and drag to move the current selected
image. |
 |
At this cursor, hold left button and drag to zoom the current selected
image. |
|
|
Hold middle button and drag to do windowing of the current
selected image. (Note: Color and grayscale windowing are independent). |
|
Hold Ctrl Key and left-click to multi-select images. Or
right-click to select the whole series. |
|
Installation
Before installation please make sure the MRease and Syngo versions of the
PC to install on matches the following version:
N4_VA15A_LATEST_20011123
syngo VA47V
syngo VA49A
To find out the version select Help -> About
MRease and the General tab. The DTI Task
Card will not run on any version different from the one
stated above.
Also, please be aware of the following issues before installing
the DTI Task Card software:
- Do not install this software on a scanner console.
- Do not install this software on a satellite console without
approval by SIEMENS.
- Installation of this software may void any warranty.
- There is no SIEMENS support or
warranty or liability for this software.
- There is no other support or warranty or liability for this
software.
For installation of the DTI Task Card
follow these steps:
- Open the Component Viewer: Start -> Syngo -> Tool Box -> Component Viewer
and make sure CM is selected.
- Open a Command Prompt window.
- Type stopcm.
- Wait until all processes are stopped as displayed in the Component Viewer.
- Extract the self-extracting archive into C:\TEMP.
- Run the install script: C:\TEMP\DTI\install.bat.
- Type startcm.
- Type rti startpmgt appl.
- Wait until the screensaver disappears.
- The additional DTI Task Card should now
show up.
- If the DTI Task Card does not show up
try rebooting the system. If it still does not show up check the
existence of the following files:
C:\MedCom\bin\TensorDatabaseBackend.dll
C:\MedCom\bin\TensorDatabaseFrontend.dll
C:\MedCom\bin\TensorDBProxyReturn.dll
C:\MedCom\bin\TensorMacroOcx.ocx
C:\MedCom\bin\TensorPbExt.dll
C:\MedCom\config\compmgr\MR.pm
C:\MedCom\config\compmgr\Tensor.pm
C:\MedCom\config\compmgr\Tensor_ext.pm
C:\MedCom\config\compmgr\Tensor_ui.pm
C:\MedCom\config\sconf\TensorDatabaseBackend_svc.conf
C:\MedCom\config\sconf\TensorMacroOcx_svc.conf
C:\MedCom\config\sconf\TensorPbExt_svc.conf
Known Issues
This software is not an official release and it is not as
tightly integrated into MRease as an
official SIEMENS task card. Due to
this reason, the following known issues may or may not be solved in
the near future.
- Current version of DTI Task Card can only deal with axial
images with 6 diffusion directions and only works with single b-value series.
- Be sure to set the Windows display to 24-bit color-depth to allow fast OpenGL
rendering. For some reason, rendering in 32-bit is much slower.
(Might be the difference of display cards).
- Computing and pre-rendering of a multi-slice data set (e.g. 23
slices) are extremely memory-consuming and may take up to a few
minutes.
Further Information
If you have questions or problems about the DTI
Task Card, please contact Ruopeng Wang
<rpwang@nmr.mgh.harvard.edu>.