Remote Access to the Martinos Center Computer System
SSH Login
Transferring Data
Sharing Data with non-Martinos users
Remote X Window Graphics over SSH Login
Remote Graphics using NoMachine Enterprise Client
Remote Graphics with VNC over SSH tunnel
Mac OS X Screen Sharing (VNC) over SSH tunnel
Web Proxy over SSH tunnel
Partners VPN
SSH Login
Access to Martinos Center systems can be gained from off site
systems using SSH (Secure SHell) to connect first to one of the
following systems:
gate.nmr.mgh.harvard.edu
entry.nmr.mgh.harvard.edu
All other machines are behind the Partners firewall and cannot be
logged into from outside of the center. If you need to use a computer
system that is behind the firewall, SSH into one of the above
externally accessible computers and then SSH to the in-center computer
to which you need access.
Linux and OSX come with a command line 'ssh' client standard.
Be careful to specify your user name when connecting.
ssh username@gate.nmr.mgh.harvard.edu
For Windows, you will need to install an SSH client. We suggest
that you install the excellent and free SSH client
PuTTY. If you have OS9, you can find NiftyTelnet or MacSSH.
Transferring Data
To transfer files to and from remote systems one must use either
anonymous FTP or a secure protocol like SSH or SFTP. Only the latter
secure options will give a user with a center account remote access to
their normal UNIX file space. Normal FTP is insecure in that password
information is sent over the net in the clear and is no longer
supported for user accounts. Programs that do SSH and/or SFTP include:
- Windows --
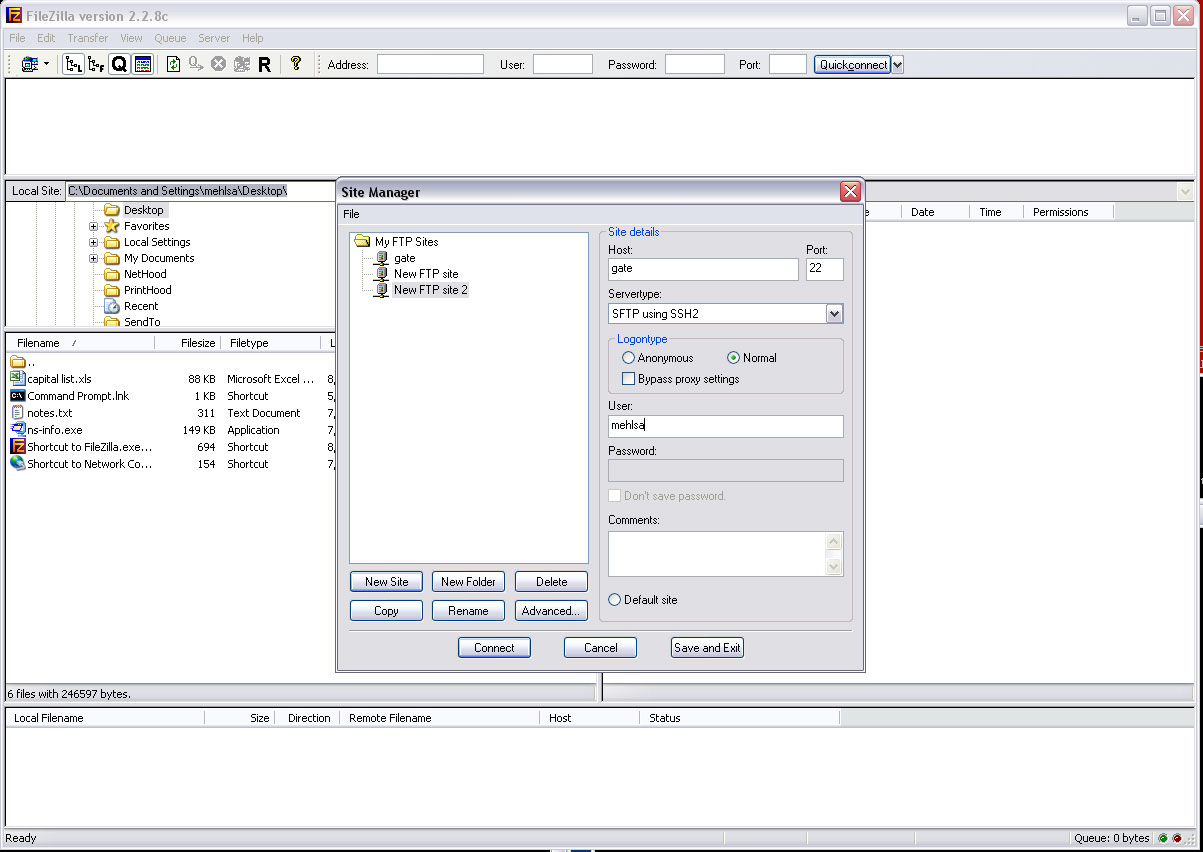
WinSCP or FileZilla. We recommend
WinSCP. If you use FileZilla, make sure to enable SFTP in the Site Manager as the default
is regular FTP which will fail (see
screenshot). Also installing rsync via Cygwin is the best option for command line users and faster than both WinSCP and FileZilla.
- Mac OS9 --
MacSFTP, which is shareware but
can be downloaded and used for free by Harvard faculty/students from
the Harvard IS website).
- Mac OSX --
The command line 'rsync', 'scp' and 'sftp' utilities are standard.
We suggest using rsync as it will copy over only what hasn't been
copied already if it gets interrupted and you restart it.
If you want a file transfer GUI for OSX,
we suggest Fugu.
- Linux --
The command line 'rsync', 'scp' and 'sftp' utilities are standard. The GNOME and
KDE desktops also usually have GUI programs that can do SFTP. Please note
that for the gFTP tool, you need to
go into File -> Options and on the SSH tab remove anything in the 'Extra Params'
textfield and check 'Use SSH2 SFTP subsys'. Also go to the Network tab and
make the default protocol SSH2.
GUI application like WinSCP or Fugu that use mouse click navigation will not
be able to navigate to
the /space or /homes or /cluster directories as these
are automount points and not user listable. The directories underneath them
only appear on explicit use. Therefore the only way to get to directories
underneath them is to open the dialog in the application that lets you type
in the full path by hand of where to navigate to.
Here is an example of this using WinSCP.
Your SCP/SFTP/RSYNC clients from outside the Martinos Center should connect to
door.nmr.mgh.harvard.edu
File transfers are not permitted from gate or entry.
A typical file transfer chore is to copy subject data from an MRI session
to your Linux box outside the Martinos Center.
First, you should ssh to door.nmr.mgh.harvard.edu and run
'findsession subjectname'
to determine where the subject's data is located in the Martinos filespace.
The location is shown in the PATH result of the findsession command.
Exit the ssh session on door and then use the transfer program appropriate to your OS from above. For example if you have a Linux box run
something like:
rsync -a username@door.nmr.mgh.harvard.edu:PATH /local/data/subjectdir
Sharing Data with non-Martinos users
When you need to exchange a files with collaborators who do not have
Martinos Center accounts, the solution is to use the FileDrop application.
This application lets you upload the attachments to a secure website and
it will send an email to all email addresses of your choice telling them
how to access them. Go to the
Martinos Center Email Server website and select
the "FileDrop" link.
The same situation applies to remote users trying to send you large
attachments. Direct them to the same site above.
FileDrop is limited to a few 100MBs. If
you have larger files, you will need to use the
Partners Research Computing Secure File Transfer & Collabortion Site.
The tools there handle amounts up to 100GB.
If you have an extremely large amount of data you would like to make
available to remote collaborators that is under a /space/... or
/cluster/... volume we can make select directories there
directly available over a password protected website URL. It will be up to you
to safely get the password to your collaborators. Contact the IT Support Group
with the path of the directory you want to be website accessible.
Remote X Window Graphics over SSH Login
Normally your SSH login will be text-only. You will not be able
to run graphical-based programs such as Freesurfer or Matlab in GUI-mode.
Most SSH clients support tunneling of X Window traffic over the
secure SSH connection if your remote machine is running an X
server. If your remote machine is a Linux box, it almost certainly is
running an X server. If you give ssh the '-X' option when you connect
to one of our SSH servers, the X window traffic of the GUI-based
programs you run like Freesurfer will be tunneled and will run.
On an OSX box, if you install "Apple X11", you will also have a X
server. In the later case you must first run "Apple X11" and execute
your ssh connection from one of the xterm windows of that program (not
Terminal).
Note that graphics requires that very large amounts of information
be transferred over the Internet, possibly making the response very
slow or, in some cases, impossible. A fast Internet connection is
necessary. A 56.6KB modem connection from your home to the Martinos
Center is not fast enough. A cable/DSL connection is probably okay
for simple GUI jobs, but not anything graphic intensive. In such
cases, it is usually better to use VNC even on a Linux or OSX box
with an X server.
Remote Graphics with NoMachine Enterprise Client
Instructions for NoMachine Enterprise Client can be found here Partners NoMachine Enterprise Client
Remote Graphics with VNC over SSH tunnel
**NEW!** VNC over SSH tunnel using Mac OS X's Native Screen Sharing App - Instructions
NOTE: We suggest all users use
NoMachine Enterprise Client described above for remote connections now.
VNC (Virtual Network Computing) is a protocol for accessing the displays
of remote computers. A VNC server runs on the remote computer
(like a web server) and you use a VNC viewer (like a web browser) on
your local box to connected to it and interact with the remote display.
ALERT! Notice I have reversed the logic of "remote" and "local"
compared to the ssh discussion above! To avoid this confusion
I will use "Martinos" and "home" instead in the further discussion.
Realize that "home" can mean any computer outside the Martinos
center including PCs at MIT or Tufts, or your laptop in Starbucks.
To use VNC for remote GUI connections you will need an ssh client
as discussed above and a vncviewer program. For Windows, I suggest you
install UltraVNC. For OSX,
there is Chicken of the VNC (which
is the best we have found so far but still quite buggy). Most
Linux distributions come with VNC software standard.
The Partners firewall prevents your VNC viewer at home or on the road
from connecting directly to any VNC server you have running at the
Martinos Center. To do VNC through the firewall, you will have
to use an
ssh tunnel.
You may want to read this page first
which shows the below steps with screenshots.
First, do a normal ssh into one of the SSH servers above
(gate or entry). Then
ssh to one of your groups Linux workstations at the center (or hydra or trabant) and run:
mkdir -p ~/.vnc
/usr/pubsw/bin/vncpasswd
/bin/vncserver
Pay attention to the VNC number given back which has a format
like hostname:X (e.g. anago:3). Please DO NOT run vncserver on gate
or entry.
The vncpasswd program is something you only need to run once or when
you want to change your password for accessing the server. This password
IS NOT IN SYNC with your normal Martinos account password. You can
use the same password as yoru Martinos account, but changing one does
not change the other.
When you
need to run the vncserver program again is a little more complex. Think
of running vncserver as booting up a computer. Then running vncviewer
(discussed below) is like turning on your monitor. If your computer
is already booted, you don't have to reboot it every time you sit
down and turn on your monitor. You only have to reboot your computer
if you find it off or crashed when you sit down. This is the same
as with the vncserver. It is a program that runs on your Linux desktop
at the center and STAYS RUNNING till you (a) explicitly kill it, (b) you
reboot your Linux desktop (which kills anything running on it), or
(c) it crashes.
I have written a script, 'vnccheck', that can be run on a machine
that will list any VNC servers you already have running on that machine. The
name of the program running will not be vncserver (which is just a
wrapper script) but will be called Xvnc. If you run 'vnccheck'
and nothing is listed, you need to run vncserver again.
Once you have the VNC server running, you need to make another ssh
connection from your home box, this time doing the tunneling needed
for VNC. How this is done depends on the ssh client. For Linux and
OSX using the command line client, you would run:
ssh -L590X:desktop:590X
username@entry.nmr.mgh.harvard.edu
where X is the display number you got when you ran vncserver
or vnccheck and desktop is the Linux desktop the VNC server is
running on. If one has a VNC server on anago:3, you would use:
ssh -L5903:anago:5903 username@entry.nmr.mgh.harvard.edu
For PuTTY, before making the connection to gate or entry, go into
the config options to make a tunnel from the the port
590X on your home box to port 590X on your Martinos desktop box.
On the initial connection dialog, look at the list in the left panel
and select Tunnels. Go to Add new forwarded port. Enter
"590X" as the Source Port. Enter
"desktop:590X" as the Destination. Then click
the Add button. Go back to the Session config and make
the connection to gate or entry.
After connecting, you must leave this second ssh session running.
There is no problem in using the session to do other things like run
pine. The first ssh connection you made can be ended without a
problem.
In the future, you can skip the first ssh connection
all together if the VNC server you started is still running.
Make the second connection with the tunneling and then ssh to your
desktop and use 'vnccheck' to make sure the VNC server is still
running on the expected display number. If it is not already
running, and ONLY IF IT IS NOT, you can run:
/bin/vncserver :X
to restart it where X is the display number you already
tunneled via ssh. This
should work unless some other user has taken that display number.
Finally, run vncviewer on your home computer. On Linux,
just run :
vncviewer localhost:X
On Windows, start the UltraVNC viewer and connect to
"localhost:X". Similarly on OSX for Chicken of VNC connect to host 'localhost' and display 'X'.
If everything connects okay, you should be asked for the VNC
password. If it does not, either the server is not running or the
tunnel is not setup correctly (or at all -- I often forget to hit the
Add button in PuTTY when setting up the tunnel).
IMPORTANT: At your normal linux desktop, make sure you have
chosen a plain desktop background. Fancy picture backgrounds will
greatly extend the redraw time of VNC.
Web Proxy over SSH tunnel
Many useful websites inside Partners are internal-only access.
On example is
http://helpdesk.partners.org. One way to access them is to
use VNC as described above. You then run a web browser in your VNC
session which will be running on an internal machine and thus have
access to the websites.
Another way to access the internal sites is to use our web proxy
over an SSH tunnel. For this you need to tunnel port 8080 on your
remote (home) computer to port 80 on our proxy server proxy.nmr.mgh.harvard.edu.
Linux and OSX users can do this by making the following ssh
connection in a terminal:
ssh -L8080:proxy:80 <username>@entry.nmr.mgh.harvard.edu
Where <username> is your NMR username.
Windows PuTTY users should make a tunnel with "8080" as
the Source Port and "proxy:80" as the Destination.
Remember to click the Add button.
Next you have to figure out how to make "localhost:8080" your
proxy for the http and SSL protocols. Look in
your browser's Preferences for something like Connection Settings.
BEWARE! Once you give your browser this proxy, it will use it
for all connections, not just to Partners websites. You should
use this only while you need it and then remove the proxy settings
immediately after you are done.
The QuickProxy
Extension for Firefox will give you a one-click way of switching
on and off the proxy. Or use the highly configurable
FoxyProxy which lets
you use the
proxy only on addresses that match
set patterns like http*partners.org*.
If you later find your browser is "broke" and cannot load
any websites, go check the proxy settings and remove it if it
is defined.
On the latest Firefox, the proxy settings are found under
Tools -> Options -> Advanced -> Network -> Connection -> Settings.
Partners VPN
If you have a Partners user account, you can apply to use the
Partners VPN which will virtually put your home desktop or laptop
inside the Partners firewall. Please see the details
here.
| 


